This chapter introduces electronic assembly techniques, and gives wiring and other information for the electronic hardware used in the course. We assume the reader has no prior electronics background. Specific assembly instructions for the RoboBoard, the battery charger, and the IR beacon are printed each year as needed.
- Electronic Assembly Technique
- The ELEC 201 RoboBoard
- The Battery System
- The Infrared Transmitter
- Cable and Connector Wiring
- Sensor Wiring
- Mounting Sensors
- Mounting the RoboBoard
- Motor Wiring
- Computer Cable Wiring
Electronic Assembly Technique
If there are places in life where "neatness counts," electronic assembly is one of them. A neatly-built and carefully soldered board will perform well for years; a sloppily -- and hastily -- assembled board will cause ongoing problems and failures. It is a good idea not to work too long at a time on building the board, as mistakes are very easy to make and costly in both time and money.
The basics of electronic assembly are covered here:
- proper soldering technique
- component mounting technique
- component polarities
Following these instructions and guidelines should make future debugging less frustrating.
Soldering Technique
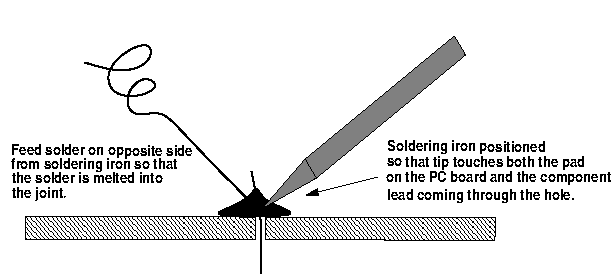
Figure 2.1 shows proper soldering technique: insert the tip of the soldering iron into the joint, touching both the lead being soldered and the surface of the PC board. Use the side of the tip when soldering. The increased surface area will transfer heat more quickly.
Then apply solder into the joint, not to the iron directly. The joint melts the solder, and both metal surfaces of the joint (the lead and the PC pad) are heated to the necessary temperature to bond chemically with the solder. Once solder flows into the joint, lift the soldering iron tip straight up, so that the finished soldered joint appears cone-shaped. This technique tends to wipe the excess solder along part of the component. Cut off any excess solder.
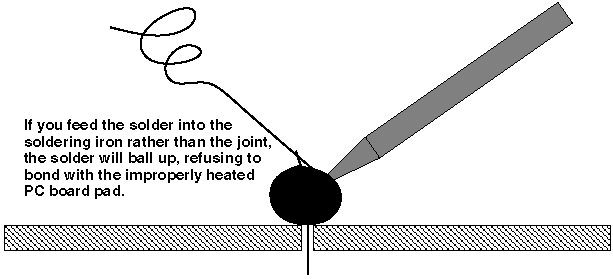
Figure 2.2 shows what happens if the solder is "painted" onto the joint after being applied to the iron directly. The solder has "balled up," refusing to bond with the pad, which did not receive enough heat from the iron.
With this technique in mind, please read the following list of pointers
about electronic assembly. All of these items are important and will
help develop good assembly skills:
- 1.
- Keep the soldering iron tip away from everything (including hair) except the point to be soldered. The iron is extremely hot and can easily damage parts, cause burns, or even start a fire. The soldering iron should be kept in its holder when not being held.
- 2.
- For cleaning off and tinning the tip, a damp sponge should be on hand. Soldering is basically a chemical process, and even a small amount of contaminants can prevent a good joint from being made. "Damp" means wet the sponge and squeeze out all excess moisture.
- 3.
- Always make sure that the tip is tinned when the iron is on. Tinning protects the tip and improves heat transfer.
- To tin the iron, clean the tip by wiping it on the damp sponge and then immediately melting some fresh solder onto it. Then wipe it on the sponge again. The tip should be shiny and coated with solder.
- If the iron has been idle awhile, always clean and then re-tin the tip before continuing.
- 4.
- The tip of the iron is nickel-plated and therefore should not be filed; this would remove the protective plating on the tip.
- 5.
- A cold solder joint is a joint containing an air bubble or other impurity that entered as the joint was cooling. Cold solder joints can be identified by their dull and mottled finish. The solder does not flow and wrap around the terminal like it should.
- Cold joints are brittle and make poor electrical connections. To fix such a joint, apply the tip (and perhaps a very small amount of solder) at the joint until the solder re-melts and flows into the terminal. If a cold solder joint reappears, remove solder with desoldering wick, and re-solder the joint.
- 6.
- Do not hold the iron against the joint for longer than 3-4
second because many electronic components can be damaged by
prolonged or excessive heat. Too much heat can also cause the
traces on the printed circuit board to peel up or even burn off.
Components that are particularly sensitive to heat damage include diodes, integrated circuits, LEDs, transistors and voltage regulators.
Desoldering Technique
It takes about ten times as long to desolder a component as it does to solder it in the first place. This is a good reason to be careful when assembling boards; however, errors will inevitably occur, and it is important to know how to fix them.
The primary reasons for performing desoldering are:
- removing an incorrectly-placed component
- removing a defective componen
- removing solder from a cold solder joint to try again with fresh solder.
The most common methods for removing solder are desoldering pumps and desoldering wick. The ELEC 201 lab includes a desoldering pump and desoldering wick as standard equipment.
To use the desoldering wick, simply place the wick between the soldering iron and the excess solder, being very careful not to apply heat for too long.
To use a desoldering pump, first load the pump by depressing the plunger until it latches. Grasp the pump in one hand and the soldering iron the other, and apply heat to the bad joint. When the solder melts, quickly remove the soldering iron and bring in the pump in one continuous motion. Trigger the pump to suck up the solder while it is still molten. This takes a little practice to get right, even for experienced builders.
Adding additional solder to a troublesome joint can be helpful in removing the last traces of solder. This works because the additional solder helps the heat to flow fully into the joint. The additional solder should be applied and de-soldered as quickly as possible. Don't wait for the solder to cool off before attempting to suck it away.
The desoldering pump tip is made of Teflon. While Teflon is heat-resistant, it is not invincible, so the Teflon tip should not be jammed directly into the soldering iron. Solder will not stick to Teflon, so the desoldering operation should suck the solder into the body of the pump. You may need to occasionally open the desoldering pump and empty out accumulated solder.
Component Types and Polarity
- A variety of electronic components will be in use when assembling the boards. The following section provides a brief introduction to these components and how to properly identify and install these parts when building the boards.
Component Polarity
Polarity refers to the concept that many electronic components are not symmetric electrically. Reversing a polarized component in a circuit will result in very different, often undesired effects. For example, passing current through an LED in one direction (forward biased direction) will cause the LED to light up. Reversing the LED will stop current flow up to a certain, often much higher, voltage. Incorrectly mounted polarized devices will not work, and in some cases will be damaged or may damage other parts of the circuit. The following components are always polarized:
- all diodes (LEDs, standard diodes, zener diodes)
- transistors and voltage regulators
- integrated circuits
Capacitors are an interesting case, because some are polarized while others are not. As a general rule, large capacitors (values 1 F and greater) are usually polarized, while smaller ones are not.
Resistors are non-polarized, meaning it does not matter in which direction electricity flows through them. However, in the RoboBoard there are resistor single-in-line packages (SIPs), and these have non-symmetric internal wiring configurations, making them polarized from a mounting point of view.
The following paragraphs discuss these components individually, explaining standardized component markings for identifying a component's polarity.
Resistors
Individual resistors are small cylindrical devices with color-coded bands indicating their value (how to read color-coding is explained in Figure 2.10).
Most of the resistors in the ELEC 201 kit are rated for watts, which is a very low power rating; hence, they are very small devices.
A few resistors are much larger: A 1 watt resistor has a large cylindrical shape, while a 5 watt resistor has a large, rectangular package.
Resistor Packs
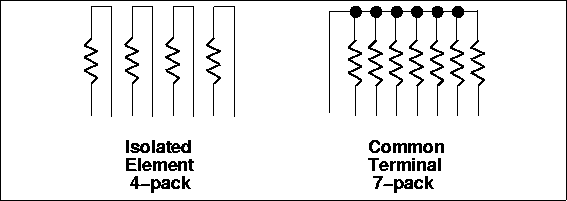
Resistor packs (or packages) are flat, rectangular packages with four, six, eight, or ten leads. There are two basic types of resistor pack:
Isolated Element. Discrete resistors; usually three, four, or five per package.
Common Terminal. One end of each resistor is tied to a common pin, and the other end is free. Any number from three to nine resistors per package.
Figure 2.3 illustrates the internal wiring for each style of 8-pin resistor pack.
All diodes (including the zener diodes and standard diodes used on the RoboBoard) have two leads, called the anode and cathode. When the anode is connected to positive voltage with respect to the cathode, current can flow through the diode; if polarity is reversed, no current flows. Zener diodes add a twist: at a particular value of reverse polarity voltage (called its "zener," or avalanche voltage), the diode conducts again. This functionality is useful in the design of voltage regulators and (the RoboBoard use) for precise over-voltage protection.
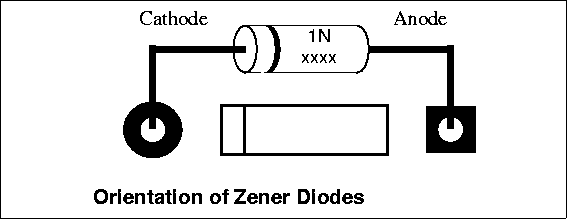
A diode package usually provides a marking that is closer to one lead than the other (a band around a cylindrical package, for example). This marked lead is always the cathode and is always inserted into Pin 2 (the end opposite the square pad on the RoboBoard).
Figure 2.4 shows a the correct orientation of the 1Nxxxx (where "xxxx" is a four digit number denoting the specific diode type) zener diodes used on the RoboBoard and on the battery charger board.
LEDs
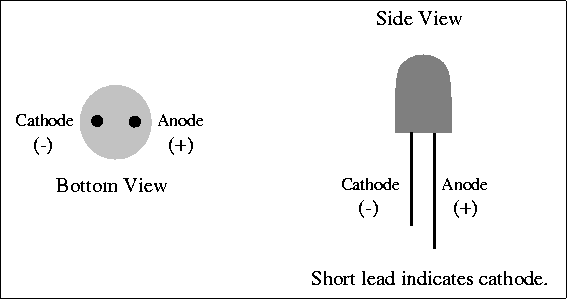
LED is short for "light-emitting diode." An LED's cathode is marked either by a small flat edge along the circumference of the diode casing or the shorter of two leads. The latter case is the one present in the 1999 ELEC 201 kit. Figure 2.5 shows a typical LED package.
Integrated Circuits
Integrated circuits, or ICs, come in a variety of package styles. Two common types, both of which are used in the RoboBoard design, are called the DIP (Dual-Inline Package), and the PLCC (Plastic Leadless Chip Carrier).
In both types, a marking on the component package signifies "pin 1" of the component's circuit. This marking may be a small dot, notch, or ridge in the package. After pin 1 is identified, pin numbering proceeds sequentially in a counter-clockwise direction around the chip package.
Figure 2.6 shows the typical marking on a DIP package. Figure 2.7 is a drawing of the PLCC package.
DIP sockets
All of the integrated circuits (ICs) on the RoboBoard (except the voltage regulators) are socketed. This means that they are not permanently soldered to the ELEC 201 RoboBoard. Components that are socketed can be easily removed from the board if they are damaged or defective.
Do not place the components into the sockets before you mount the sockets onto the board! Sockets are also used to avoid the need to solder directly to ICs, reducing the likelihood of heat damage.
DIP sockets have similar markings to those found on the component that they hold. DIP sockets are not mechanically polarized, but the marking indicates how the chip should be mounted into the socket after the socket has been soldered into the board.
PLCC Sockets
Sockets are polarized; however, a PLCC chip can only be inserted into the socket the "correct" way. Of course, this way is only correct if the socket is mounted right in the first place.
When assembling the ELEC 201 RoboBoard, a marking printed onto the board indicates the correct orientation of the PLCC socket.
Capacitors
Several different kinds of capacitors are made, each having different properties. There are four different types of capacitors in the ELEC 201 kit:
As indicated, some capacitors are polarized and will therefore require special attention when mounting. This is very important.
On the ELEC 201 boards, all polarized capacitor placements are marked with a plus symbol (). The capacitors themselves sometimes are obviously marked and sometimes are not. One or both of the positive or negative leads may be marked, using () and () symbols. In this case, install the lead marked () in the hole marked (). The () hole is also the hole with the square pad.
Some capacitors may not be marked with ( ) and () symbols. In this case, the positive () lead will be marked with a dot or a vertical bar.
Polarized capacitors mounted backwards won't work. In fact, they often overheat and explode. They should be mounted carefully. When in doubt, ask.
Inductors
The inductors used in the ELEC 201 kit are a miniature coil of wire wound around a small ferrite core. They are about the size of a pencil eraser.
Some inductors are coated with epoxy and look a lot like resistors. Others are big bulky coils with iron cores. Inductors usually are not polarized.
Transistors and Voltage Regulators
The transistors and voltage regulators used in the ELEC 201 kit are small, three-wire devices. They stand out since they are the only three-wire devices used. Transistors and voltage regulators are polarized.
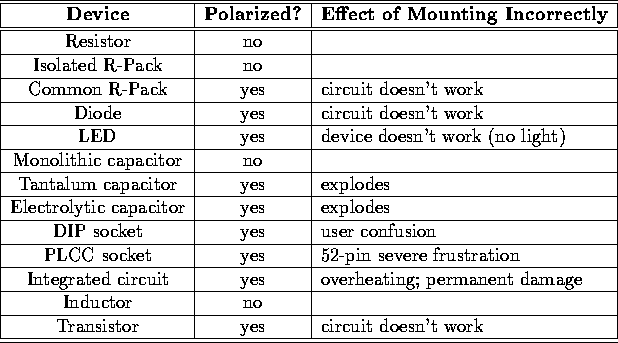
The table shown in Figure 2.8 summarizes this discussion with regard to polarity issues.
Component Mounting
When mounting components, the general rule is to try to mount them as close to the board as possible. The main exceptions are components that must be spaced away from the board before being soldered; some resistors fall into this category.
All LEDs used in the ELEC 201 kit are mounted upright while all resistors are intended to lay flat.
See Figure 2.9 for clarification.
Component Value Markings
Various electronic components have their values marked on them in different ways. For example, value markings on some resistors are based on a color code (see Figure 2.10). Other devices, such as transistors and integrated circuits, have their part number printed on the device package.
Still others may have several numbers printed on them, some of which are unrelated to their value.
Resistors
The largest resistors -- in terms of wattage, not resistive value -- simply have their value printed on them.
Other resistors are labeled using a standard color code. This color code consists of three value bands (four for a 1% resistor) plus a tolerance band. The first two of the three value bands form the value mantissa. The final value band is an exponent.
It is easiest to locate the tolerance band first. This is a metallic silver-, gold-, or brown-colored band. If it is silver, the resistor has a tolerance of 10%, if gold, the resistor has a tolerance of 5%, and if brown, the resistor has a tolerance of 1%. If the tolerance band is missing, the tolerance is 20%.
The more significant mantissa band begins opposite the tolerance band. If there is no tolerance band, the more significant mantissa band is the one nearer to an end of the resistor.
Figure 2.10 shows the meaning of the colors used in reading resistors.
 |
A few examples should make this clear. (See figure 2.11
for help)
- brown,
black, red:
First band: brown-1
Second band: black-0
Third band (multiplier value): red-(100)
- yellow,
violet,
orange:
First band: yellow-4
Second band: violet-7
Third band: orange-(1000)
So have 47 1000 = 47,000 ohms, or 47k.
- brown,
black, orange:
First band: brown-1
Second band: black-0
Third band: orange-(1000)
So have 10,000 ohms, or 10k.
- brown,
black, black,
red:
First band: brown-1
Second band: black-0
Third band: black-0
Fourth band (multiplier value): black-(100)
So have 100 100 = 10,000 ohms, or 10k(for a 1% resistor).
Capacitors
Reading capacitor values can be confusing because there often are numbers printed on the capacitor that have nothing to do with its value. So the first task is to determine which are the relevant numbers and which are the irrelevant ones.
For large capacitors (values of 1F and greater), the value is often printed plainly on the package; for example, "4.7F". Sometimes the "" symbol acts as a decimal point; e.g., "47" for a 4.7F value.
Capacitors smaller than 1F have their values printed in picofarads (pF). There are 1,000,000 pF in one F, and 1,000,000 F in one Farad.
Capacitor values are similar to resistor values in that there are two digits of mantissa followed by one digit of exponent. Hence the value "472" indicates 47 picofarads, which is 4700 picofarads or 0.0047 F.
The ELEC 201 RoboBoard
The ELEC 201 RoboBoard is the heart of the ELEC 201 Robot Controller system. It uses a Motorola 68HC11 family microprocessor coupled with 32K ofnon-volatile memory. It has outputs to drive six motors, inputs for a variety of sensors, a serial communications port for downloading programs and user interaction, and many other features.
Debugging a Non-working RoboBoard
It is possible that after your best efforts, your RoboBoard is non-functional. This section provides some help to isolating and correcting the cause of the failure. A good working knowledge of the logical design of the RoboBoard and of the function of the various chips is invaluable in finding a fault, so read Chapter 5 carefully. The steps below will give you additional insight on the operation of the RoboBoard and its components, so read the entire section before starting. Also invaluable is a working RoboBoard, which can provide a comparison for measurements, but most importantly, provides a source of known-working chips for substitution. The donor RoboBoard should be loaded with p-code and optionally with a test program like testports. The two different cases of a board that has never worked, and a previously operating board that has failed, are treated separately below. However, there are a few common checks that should be done in any case.
- First, put out the fire. Just kidding, although it has happened. If nothing shows on the display, first check the contrast adjustment pot; also check its value, as it (10K) and the roboknob (100K) are often interchanged.
- More importantly, sometimes a board will act crazy or dead when you turn it on because it is trying to run some (perhaps disfunctional) main() program that has been downloaded. It could be waiting for a start light, for example. To avoid this, hold down the CHOOSE button while turning on the power, which bypasses the main() function and goes directly to the IC prompt/heartbeat. Also, unfortunately, p-code often gets trashed by an error from a user program and causes problems. Reloading p-code will solve both problems and is a good test. If this doesn't help, or the board is really dead, proceed to the next step.
- Disconnect everything connected to the board.
- Be careful about what you set the board down on. Bench tops are often covered with bits of wire and solder that can short pins. Put the board on a clean piece of paper.
- Measure the battery voltage and polarity.
- Turn on the board and measure the output of the 5 V logic power supply. If the logic supply is low, a bad component or a short is probably drawing too much current. While regulators do fail, they are quite rugged. Note that the regulator will shut off to protect itself if the current draw is too high, in which case the regulator, U14, will be very hot, so be careful. A good way to check the regulator is to remove the jumper next to it, J27. This isolates the regulator output from all the components on the board except the filter capacitors C6, C7, and C17. Check them for correct installed polarity and shorts. If the output voltage is still not correct (check right on the pins of the regulator), the regulator is probably bad; replace and recheck. If removing J27 does result in a 5 V output, then the task is to find the component or short that is causing the current draw. Removing all the chips is a good starting point, then proceed, monitoring the current draw at J27, while replacing first the Minimum Functional Chip Set (see below). After that, follow the rest of the steps below as appropriate.
- Measure the output of the 5 V supply, at U13, for the motor chips. If this is low, pull the motor chips and remeasure. If the output is still low or zero, the regulator probably needs to be replaced, as there really is nothing else connected to the output, but check the filter capacitors C18 and C19 as well for correct polarity and shorts.
Failure at Initial Operation
The usual cause of a failure at first startup is an error in construction. So the primary steps involve looking for common errors and then uncommon errors. First be sure to perform the power supply checks listed above.
- Make sure J27 is in place, or no logic power will get to the board.
- Inspect each chip location carefully to verify that each has the correct chip, that it is oriented properly, and that all pins are actually inserted into the socket (and not bent under the package).
- Check the polarity of all the electrolytic capacitors for correct installation. Installation backwards can cause excess current draw and occasionally sparks, but sometimes no problem will show up for some time.
- Check the polarity of all the zener diodes, both at the motor ports and the data input ports.
- Inspect the soldering for shorts and cold solder joints. In really bad cases, you just have to go over all the joints again and redo them.
- Trim off excess lead length on the solder side of the board with diagonal cutters.
If none of the above helps, go on to the next steps.
Failure of a Previously Working Board
If the source of a problem is not obvious from such information as voltage checks and the nature of the problem, one technique is to pull out chips to get to the minimum working configuration, and then to replace chips sequentially with known-good ones from a working donor board.
The Minimum Functional Chip Set
Will run the IC logo and heartbeat on the display. The set consists of:
- 1.
- The processor, U3, 68HC11A0.
- 2.
- The memory, U2, DS1230Y loaded with p-code from a donor board.
- 3.
- The 74HC373, U1, memory address latch.
- 4.
- The PAL16L8 chip, U19, to provide memory enable on pin 19.
- 5.
- The MAX 704, U5, for the reset function on power application.
- 6.
- The 74HC245, U15, which senses the CHOOSE button.
- 7.
- The LCD, which supplies a status return to the processor.
- Pull all the chips except the Minimum Functional Set above. Use a known-good LCD, and check the contrast pot adjustment.
- Turn on the power; the display should show the IC heartbeat, indicating all the chips are good.
- If "Halted" appears on the display, replace the 74HC245 and try again.
- If nothing appears on the display, start substituting chips from a working donor board. My order is processor, 74HC373, PAL, and MAX 704 (rarely a problem). When you find the problem you can back substitute to verify the bad chip. If you substitute all of the Minimum Functional Chip Set from a working donor board, and the voltages are correct, and the board still does not work, you have a big problem: a board fault or a bad on-board component. Fortunately, this is rare, especially if the board has worked previously. Check the solder joints first, and then everything else carefully. Call for help.
- Assuming the board now works minimally, add the next functionality, downloading and digital inputs, by adding the MAX 220, which rarely fails.
- You should now be able to download p-code and use IC to beep(), etc. Note, if there is no beep, it could be the beeper (jumper in another) or Q4, the driver transistor (check the base drive and output), or a missing jumper J26.
- You should be able to load testports.lis for more testing. Digital inputs #0, 1, and 30 should work as they go directly to the processor; if not replace the processor.
- Check digital input ports #2-7. These make use of additional capability of the 74HC245, so if there is a problem, replace it.
- Add both the 74HC4051 chips to add the analog input function. U9 supports ports #20-27, and U10 supports ports #28 and 29 plus the roboknob, dip switches, and battery voltage measuring functions. Check all and replace the responsible chip as necessary.
- Now add U7, the 74HC574 chip to enable the LED output drivers. Pins 12 and 13 drive the 2N4401 driving transistors, which do burn out if abused. Check the drive at the transistor bases to see if the problem is U7 or the transistor.
- Add IR beacon functionality by installing the 74HC390 chip. This is not necessary for board operation but it checks additional PAL chip functionalities (pin 12). The driver transistor Q3 could also be bad.
- Provide motor port function. First double check the zener diode orientations, then add the three 74HC574 latches; use known-good chips. Add the motor driver chips. Check all the motor ports, both forward and reverse. If nothing works, the problem could be the PAL, which provides enable signals out of pins 16, 17, and 18. Replace the motor driver chips as necessary, and give thanks that they are in sockets in this version of the board. If everything works, you can go back and check the original latches.
- Finally, check the LCD display. Put in the original one, and recheck the contrast adjustment pot. The processor will halt if it does not receive a status signal from the display. Check that the pins really insert fully into the socket on the board--a problem if the longer male header was not used. The LCD driver chips are on the LCD board, so replacement of the display is the only option if it is still not working.
And that is all there is, so the RoboBoard should be fully functional at this point. In some cases, and with practice, you can skip some of the steps above if the problem is obviously limited to a particular area, like the motor drivers (a common problem). In that case, just pull the driver chips and the 574 latches and see if everything else works OK. If it does, just substitute latches and motor drivers. For other problems, jump into the sequence above at the appropriate point.
Finally, please destroy and discard all chips found to be bad. Then fill up your donor RoboBoard with new chips as necessary, load it with p-code and testports, and test it, so you will be ready for the next problem.
The Battery System
The ELEC 201 Robot Controller system uses a Panasonic 12 volt lead-acid battery rated for 1.3 ampere-hours of operation. These batteries are rechargeable. The battery is connected to the RoboBoard through the battery connector, labeled "DC in".
These lead-acid cells are extremely powerful devices. Car batteries are constructed of similar lead-acid technology. When handling the batteries, be extremely careful not to short the ( ) and () terminals of the battery together. A huge surge of current will flow, melting the wire and causing burns. In extreme cases, batteries can explode and cause serious injury.
You will be supplied with a pre-assembled batttery cable, but in case you need to repair yours, or make a new one, here are instructions.
Figure 2.17 illustrates how to wire the battery plug and cable assembly.
- Cut a 12" to 16" length of the black/red twin cable for use in making the battery cable. Strip and tin the wire ends at both ends of the cable. One end should have about inch of exposed tinned wire; the other end (which will be connected to the power plug) should have about inch exposed. At this end the red wire should be about inch shorter than the black wire.
- If your female power jack has a hexagonal barrel and a flexible sleeve there is no need to ream the jack. Proceed to the next step. Otherwise, use the reaming tool borrowed from the lab assistant, enlarge the small end of the black annular connector cover. Return the tool to the lab assistant. Slide the cover, reamed end first, onto the tinned leads. Push back about six inches.
- Heat-shrink tubing is used on both terminals of the DC power plug. The tubing acts as an insulator to minimize the likelihood of an electrical short at the plug terminals. It is essential that this wiring be performed carefully because a short in the power plug will short out the battery terminals and create a serious hazard. Place a inch long piece of heat shrink tubing on each wire before soldering to the power plug. Be sure to keep the heat shrink tubing well away from the point of soldering or it will shrink prematurely.
- Proper polarity is important. The use of red wire to signify the "+" terminal and black wire to signify the terminal is an international standard. Using the "helping hands", position the black wire under the short terminal and solder. Then position the red wire inside the long terminal and bend down the tabs to ensure a good mechanical connection. Solder.
- After soldering, slide the heat-shrink tubing down over both terminals and shrink.
- Screw the plug cover onto the plug.
- Place the pink shielded terminal on the inch of exposed tinned wire of the red lead. Place the blue shielded terminal on the inch of exposed tinned wire of the black lead. Use the crimping tool (borrowed from a lab assistant) to crimp the terminals onto the wire. Use the "red dot" location on the crimping tool, and squeeze the tool until it releases (this takes a lot of pressure). Be sure to return the tool when you are finished!
- Before installing the cable onto a battery, use an ohmmeter to make absolutely sure that the cable is not shorted. The cable should measure open circuit or infinite resistance. If a conductor is placed across the terminals of lead-acid batteries, a huge surge of current will flow, melting the wire responsible for the short circuit and possibly causing the battery to explode.
- Make sure to connect the red wire (pink terminal) to the terminal of the battery.
Wiring the 12 VDC Adaptor
You should receive an adaptor that is
already wired, but if you need to repair yours, or make a new one, here
are instructions.
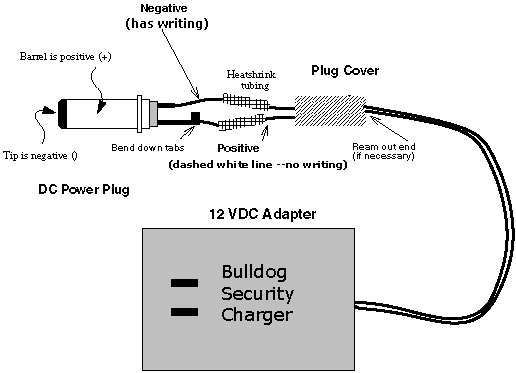
Figure 2.18 illustrates how to wire the 12 volt DC adaptor and cable assembly. NOTE: DO NOT use the adaptor with the existing connector as it comes out of the box. It has opposite polarity from that required. Also, we use various models o adaptors, and the wiring markings may vary from that shown. To be sure, first measure the polarity of the output using your multimeter and modify the instructions accordingly.
- Examine the 12 Volt DC power adapter. Clip off and discard the existing power plug near the base of the plug (this may have already been done for you). Strip inches of insulation from power wires and tin. At this end the non-ribbed wire should be about inch shorter than the black wire.
- If your female power jack has a hexagonal barrel and a flexible sleeve there is no need to ream the jack. Proceed to the next step. Otherwise, use the reaming tool borrowed from the lab assistant, enlarge the small end of the black annular connector cover. Return the tool to the lab assistant. Slide the cover, reamed end first, onto the tinned leads. Push back about six inches.
- Heat-shrink tubing is used on both terminals of the DC power plug. The tubing acts as an insulator to minimize the likelihood of an electrical short at the plug terminals. It is essential to perform this wiring carefully because a short in the power plug will short out the battery terminals and create a serious hazard. Place a inch long piece of heat shrink tubing on each wire before soldering to the power plug. Be sure to keep the heat shrink tubing well away from the point of soldering or it will shrink prematurely.
- Using the "helping hands", position the ribbed wire under the short terminal and solder. Then position the non-ribbed wire inside the long terminal and bend down the tabs to ensure a good mechanical connection. Solder. It is essential that this wiring be performed carefully because a short in the power plug will short out the DC adaptor.
- After soldering, slide the heat-shrink tubing down over both terminals and shrink.
- Screw the plug cover onto the plug.
- Before using the modified adaptor, use a voltmeter to make absolutely sure that the connections are correct. Plug in the adaptor to a wall outlet and place the black voltmeter probe inside the barrel of the power connector, and the red lead on the outside of the barrel. You should read positive voltage.
The Infrared Transmitter
The infrared (IR) transmitter board emits modulated infrared light that can be detected by the Sharp GP1U52X IR sensors. The IR board features eight infrared emitting diodes positioned in a circle to generate a 360 degree signal. The diodes are driven by an oscillator circuit (the 74HC390 chip) and a transistor amplifier on the RoboBoard.
The infrared LEDs are wired in series to minimize the current draw from the battery. The board also contains a visible LED, that when lighted, indicates all IR LEDs are transmitting. An unlit LED indicates problems with the board.
You will receive an assembled IR transmitter.
Cable and Connector Wiring
This section explains how to build reliable cables and connectors for the motors and sensors that will plug into the robot's controller boards.
Sturdy and reliable connectors are critical to the success of a robot. If a robot's connectors are built sloppily, hardware problems will occur. Well-built connectors will help make the robot more reliable overall and will ease development difficulties.
Sensors and motors are built with fixed wiring, which means that a sensor or motor will have a fixed length of wire terminating in a connector. It is possible to build extension cables, but it is more time-efficient to build cables that are the proper length already.
The average robot has its control electronics near the physical center of the robot; hence, motors and sensor cables need to reach from the center of the robot to their mounting position. Given this geometry, most robots will need sensor and motor cables between 6 and 12 inches long.
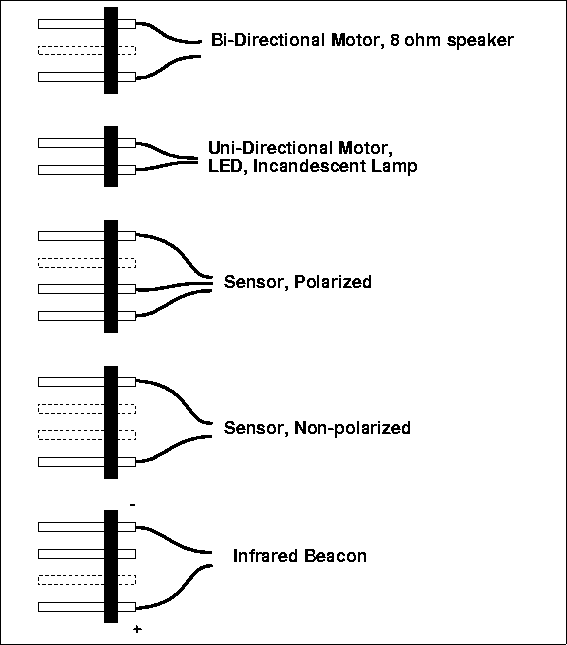
Several different connector styles are used depending on the device that is being connected to the robot. Figure 2.21 shows the connector configurations used for bidirectional motors, unidirectional motors, sensors, and the infrared beacon.
The ribbon cable provided in the ELEC 201 kit is best for making sensor and motor cables. Use the "helping hands" to hold the connectors while soldering.
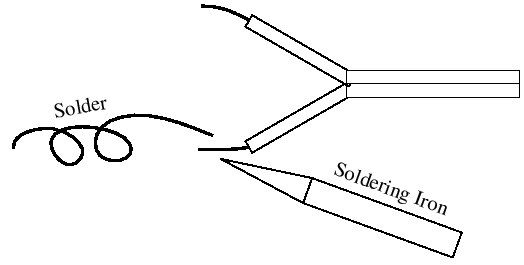
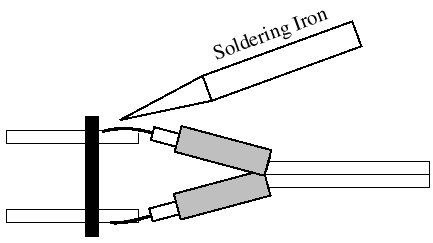
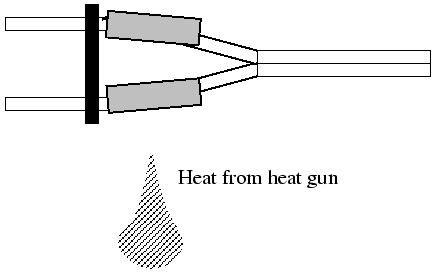
Figures 2.22 through 2.25 illustrate the recommended method for wiring to a connector plug. When assembled properly, this method will provide for a sturdy, well-insulated connector that will be reliable over a long period of use.
Be sure to place heat-shrink tubing on the wires, well away from the connection, before soldering. After soldering, slide the heat-shrink tubing down over the pins to make a neat connection. Then apply heat.
The example shows wiring to opposite ends of a three-pin plug, as would commonly be used when wiring to a motor. The method, however, is suitable for all kinds of connectors.
Step One: Strip a small amount of insulation off the wire ends. Tin the wire ends by applying a thin coat of solder to them.
Step Two: Cut the male connector to size. This example shows a plug that can be used to wire a motor or the infrared transmitter. Cut 1/2 inch length pieces of heat-shrink tubing, and slide over tinned wires, well away from the point of soldering.
Step Three: Using the "helping hands", hold the connector and wires in place and solder. Clip wires to a little less than the length of the male pins before soldering.
Step Four: Slide pieces of heat-shrink tubing over
connections. Shrink using heat gun.
Sensor Wiring
This section shows wiring diagrams for the following sensors:
- Touch sensors
- Mercury Tilt Switch
- Photocell light sensor
- Infrared reflectance sensor
- Bend sensors (the Fall '98 ELEC 201 kit does not have bend sensors)
- Sharp infrared sensor
- Potentiometer position sensors
- Slotted optical switch
- Hall effect (magnetic) sensor
- Magnetic Switches
In most cases, some discussion of the sensor's principle of operation accompanies the wiring diagram. Further information on the use of all sensors is found in Chapter 9. Examples of correctly wired sensors are available for your inspection. As a general rule, do not wire a sensor until it is needed. This will conserve material, and will result in cable lengths appropriate to your robot.
Touch Sensors
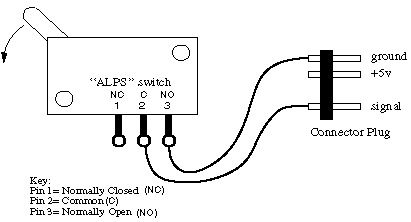
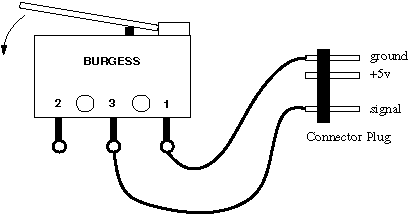
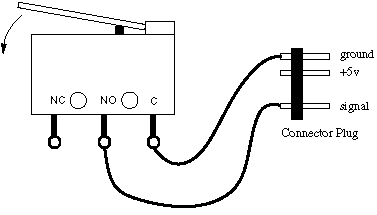
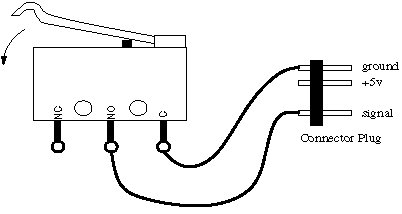
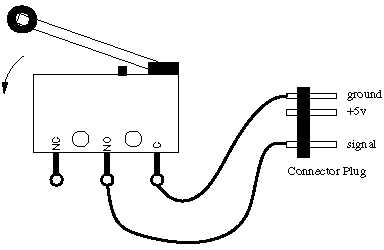
Several switches in the ELEC 201 kit may be used to make touch sensors. Diagrams for the white "ALPS" switch, the small red push-button switch, the Burgess lever switch, the lever switch, the mock roller switch, and the roller switch are shown.
Touch switches should be wired in a normally open configuration, so that the signal line is brought to ground only when the switch is depressed.
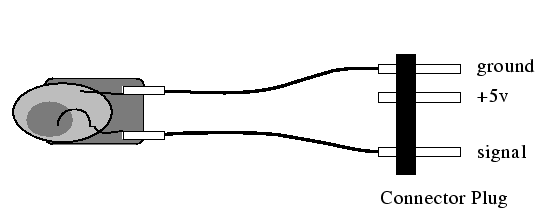
Photocell Light Sensor
The photocell is a special type of resistor whose resistance varies in proportion to the impinging light. The more light hitting the photocell, the lower its resistance.
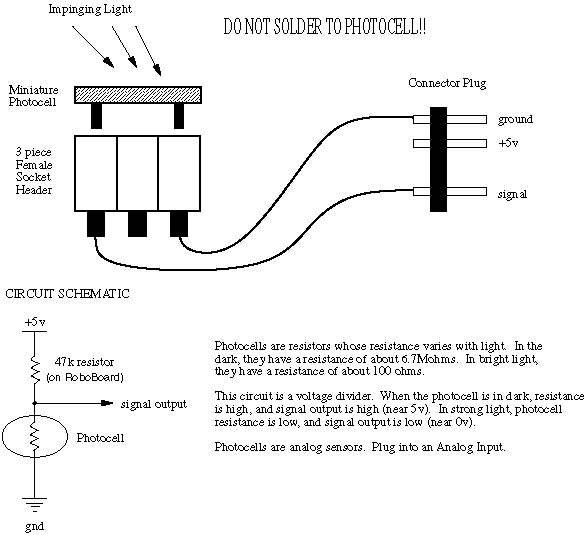
The output signal of the photocell is an analog voltage corresponding to the amount of light hitting the cell. Higher values correspond to less light.
Mercury Tilt Switch
Assemble the Mercury Tilt Switch according to the diagram below. Be sure to apply heat-shrink to both ends.
Infrared Reflectance Sensor
IR reflectance sensors contain a matched infrared transmitter and infrared receiver pair. These devices work by measuring the amount of light that is reflected into the receiver. Because the receiver also responds to ambient light, the device works best when well shielded from ambient light, and when the distance between the sensor and the reflective surface is small (less than 5mm). IR reflectance sensors are used primarily to detect white and black surfaces. As you would imagine, white surfaces generally reflect well, while black surfaces reflect poorly.
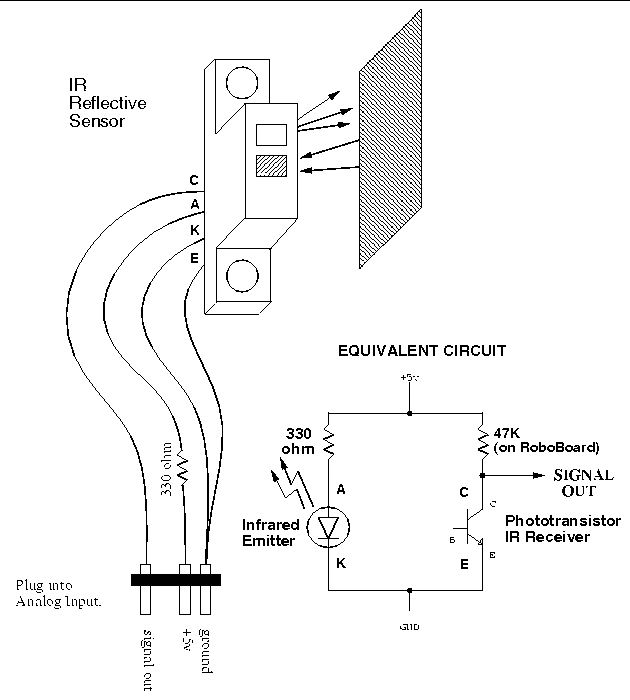
The output signal of the phototransistor receiver is an analog voltage corresponding to the amount of light hitting the phototransistor. Higher values correspond to less light, and hence, a smaller degree of surface reflectivity.
Sharp Infrared Sensor
The Sharp GP1U52X sensor detects infrared light modulated (e.g., blinking on and off) at 40,000 Hz. It has an active low digital output, meaning that when it detects the infrared light, its output is zero volts.
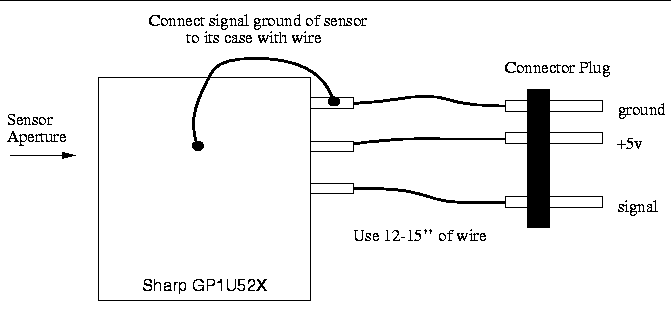
The metal case of the sensor must be wired to circuit ground, as indicated in the diagram. This makes the metal case act as a Faraday cage, protecting the sensor from electromagnetic noise.
Use of the Sharp sensor is discussed in Section 10.11.2. An explanation of how the infrared system works is given in Section 5.8.
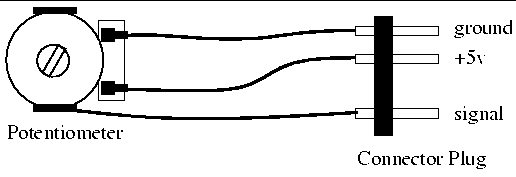
Potentiometer
The potentiometer can be used as a rudimentary rotary position sensor. The first diagram deals with shafted potentiometers. The second deals with slotted potentiometers.

Slotted Optical Switch
Like the IR reflective sensor, the slotted optical switch contains a matched infrared transmitter and infrared receiver. The slotted optical switch also works by measuring the amount of light transmitted from the transmitter to the receiver, but in this case the transmission is direct, rather than reflected. Best results are again achieved when ambient light is shielded from the device. We recommend that you examine the sample before attempting to wire a slotted optical switch.
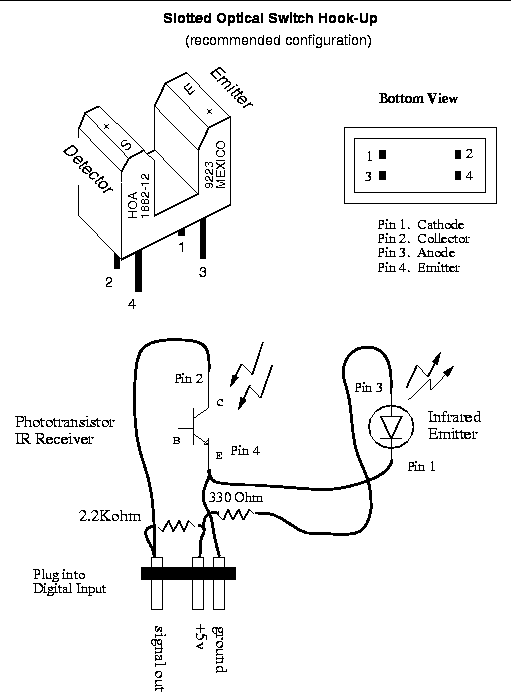
The output signal of phototransistor element is an analog voltage that corresponds to the amount of light hitting the phototransistor. Higher values indicate less light. Generally, however, the slotted switch is used as a digital sensor, with the two states Blocked and Unblocked.
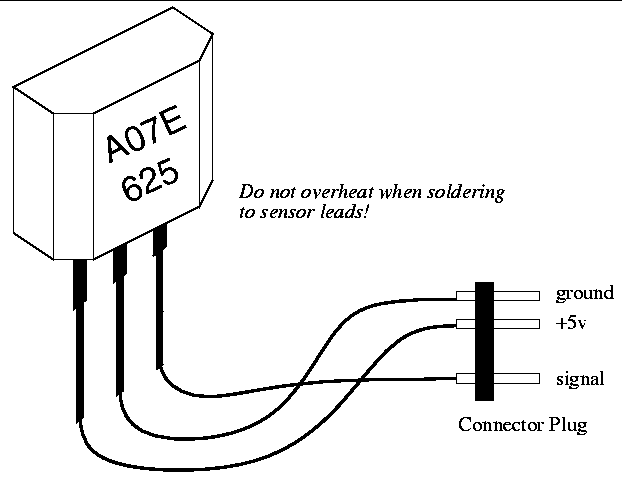
Hall effect sensor
The Hall effect sensor detects the presence of a magnetic field. The charts on the following page show the results of laboratory tests and provide useful information on the expected performance of the Hall effect sensors. The device can be easily damaged during soldering. Be careful not to apply too much heat or to stress the device leads. This device is not in your kit, but can be obtained from a lab assistant.
Magnetic Switches
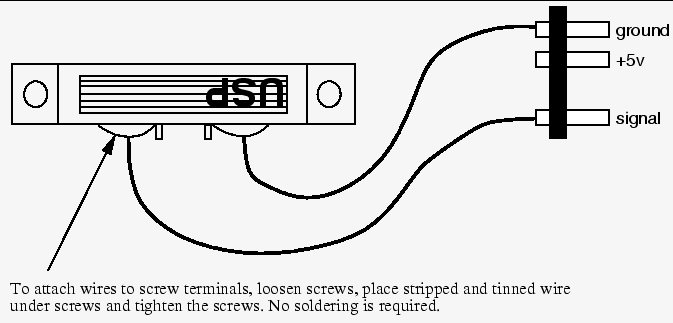
These magnetic switches are used as window sensors in home security systems. The switch will close when it comes within 1" of its companion magnet.
Mounting Sensors
The mounting of sensors on LEGO pieces is an important step towards providing your robot with the ability to interact with its surroundings. Sensors mounted haphazardly can behave unreliably and provide the robot with false or misleading data. The ideas presented here are just suggestions; feel free to experiment.
Switches
Bumpers
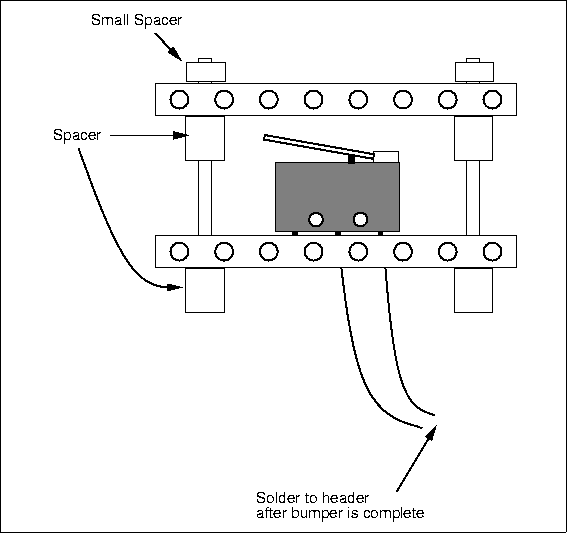
- Take a lever switch and solder the wires to the body of the switch but not to the header.
- Thread the wires through two adjacent holes in a LEGO beam and pull the switch flush with the beam. If necessary, bend the outer leads to hold the switch in place. Tape may also be used to secure the sensor temporarily. Do not use tape for a permanent mounting.
- Place axles to the left and right of the switch and attach an additional beam with spacers in front of the switch, as show in Figure 2.26.
An Alps switch may be mounted in a similar manner.
Side Mounting
- Take a roller switch and solder the wires to the body of the switch but not to the header.
- Thread the wires through two adjacent holes in a LEGO beam and pull the switch flush with the beam. If necessary, bend the outer leads to hold the switch in place. Tape may also be used to secure the sensor.
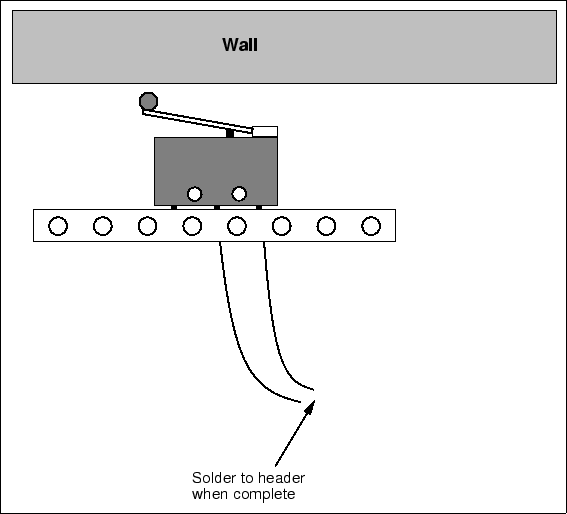
If mounted on the side of a robot, this yields a side collision sensor that creates little friction along walls.
IR Reflectance Sensors
The IR reflectance sensors can be mounted on a LEGO with some slight modification to the body of the sensor. Epoxy (obtained from a lab assistant) can also be used.
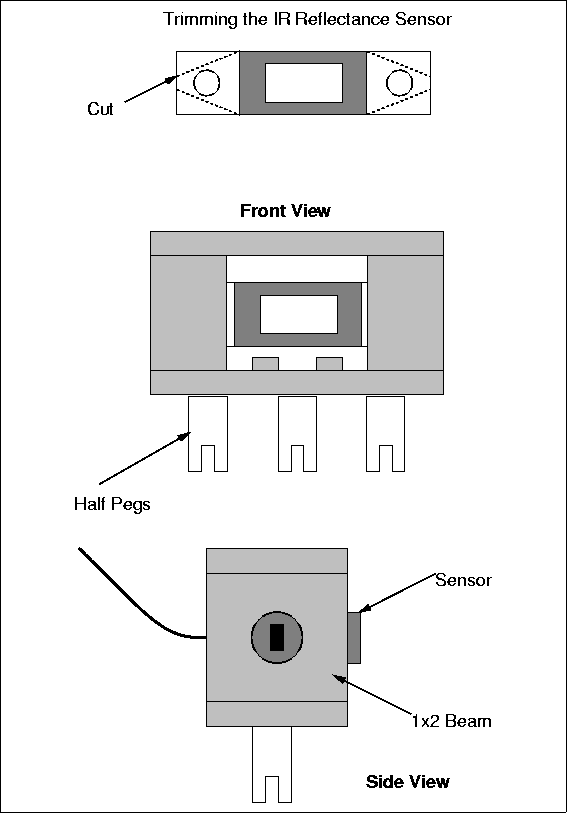
- Trim the side flanges of the sensors with diagonal cutters or a utility knife as shown in Figure 2.27.
- Insert each side flange into a 1x2 beam. Connect the beams with
2 2x4 beam plates. The assembly should resemble a small box as in
Figure 2.27.
- Attach 3 half-pegs to the back of one of the 2x4 beam plates. This allows the assembly to be mounted on any beam.
Slotted Optical Switches
Slotted optical switches are primarily used to count the number of times a wheel rotates. The following methods deal with how to build these devices, known as shaft encoders.
Epoxy Method
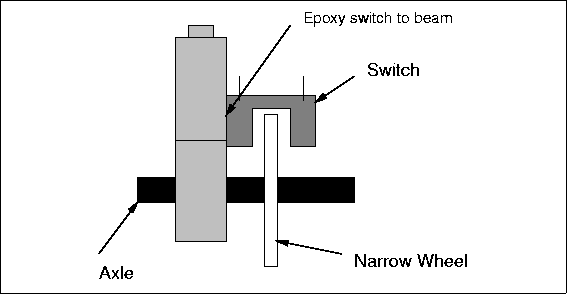
Simply epoxy the switch to a short beam that is above or below a rotating wheel as shown in Figure 2.28. Make sure the holes in the narrow wheel periodically break the beam in the slotted switch when the wheel rotates.
LEGO Method
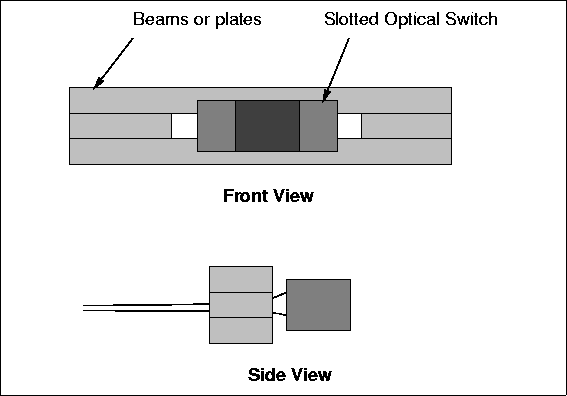
Place two 1x2 plates on a LEGO beam. Space them 2 dots apart. Insert the wires of the slotted optical switch between the two 1x2 plates. Pull the switch as flush as possible with the LEGO. Place a beam across the 1x2 plates to hold the switch in place. The device should now look like Figure 2.29.
Photocells
The procedure for mounting photocells is very similar to the procedure for mounting IR reflectance sensors.
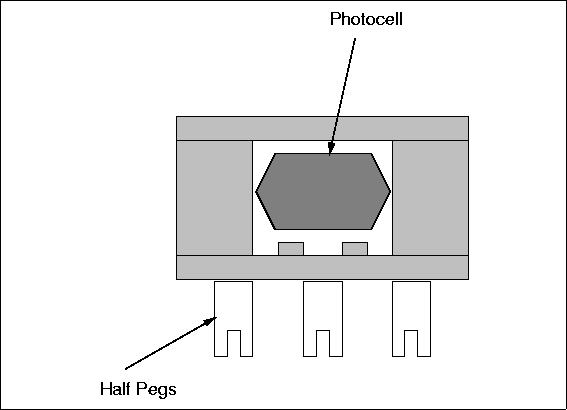
- Place two 1x2 beams on a 2x4 beam plate as with the IR reflectance sensors.
- Place the photocell with its shielding between the two beams, and add the second 2x4 beam plate.
The assembly should resemble Figure 2.30.
Potentiometers
Both kinds of potentiometers provided in the 1999 ELEC 201 kit can have gears attached to them.
Slotted Potentiometer
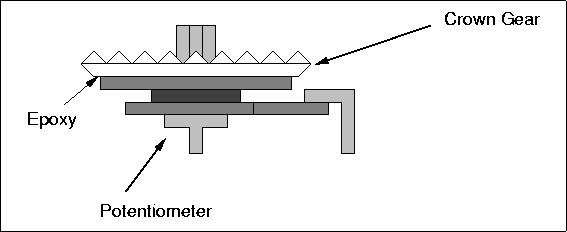
The only gear that will fit this style of potentiometer is a crown gear. Notice how well the crown gear fits on the face of the potentiometer. Epoxy the crown gear to the face of the potentiometer as in Figure 2.31.
Shaft Potentiometers
The shaft on these potentiometers can fit most any LEGO gear. Simply slip the gear onto the shaft. Most gears should work without slipping, although crown gears do not.
Mounting the RoboBoard
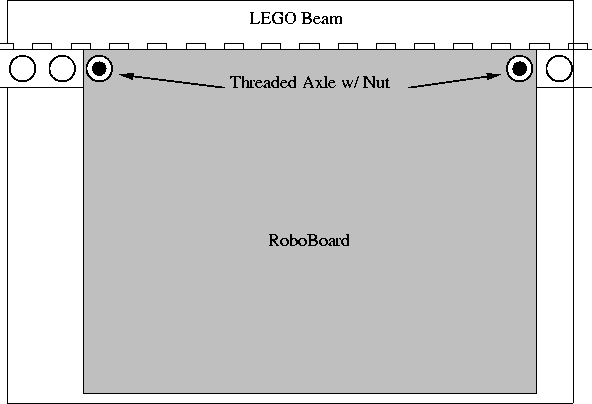
The RoboBoard can be LEGOized by using the threaded axles and a long LEGO beam. LEGOizing the RoboBoard could make it easier to mount to your robot. Figure 2.32 shows a RoboBoard mounted to a 16-Long LEGO beam. The threaded axles are slipped through the mounting holes on the RoboBoard and one of the holes in the LEGO beam. The threaded axles are then secured using two axle nuts. The side of the board with the LCD display can be mounted on LEGO by using one threaded axle and a 1 inch nylon screw. If you wish to do this, ask your lab assistant for a 1 inch nylon screw.
Motor Wiring
The ELEC 201 kit includes two different shapes of motors: round Johnson motors, and oblate Johnson motors. This section will explain how to mount these motors onto a piece of LEGO to be used in robot construction.
In every case, an eight-tooth LEGO gear should be more or less permanently installed on the motor shaft. In general, this is the most useful motor configuration.
It is recommended that two motors with the eight-tooth gear mount be built and evaluated. Later, it can be decided if the remaining motors should be built differently. Only for unusual applications will another configuration be preferable.
LEGOizing the Round Johnson (and old Mabuchi) Motors
The original method of mounting gears to motors using shrink tubing is described below. It is relatively simple, but it is not flexible. To change the type of gear, or to remount the motor on another beam, the gear, epoxy, and shrink tubing must be removed and redone. We now glue a small piece of LEGO axle to the motor shaft. Instructions for the new method are on a Quick Link page.
Old Method:
|
|
Score the motor shaft slightly with sandpaper, taking great care not to get sand inside the motor. Hold the motor shaft-down during the scoring procedure. |
|
|
Cut a piece of small heat-shrink tubing the length of one 8-tooth gear. |
|
|
Place a very small amount
of epoxy or super glue on the end of the shaft, slide the
heat-shrink tubing onto the shaft, and apply heat (to the shaft,
not to the motor). Make sure that the tubing is not
rubbing against the motor housing when the shaft turns. This
action could cause a decrease in the performance of the motor.
The LEGO gear should be able to fit very snugly over the shaft
and the tubing. If not, an extra piece of tubing should be
shrunk over the first one. Do not install the gear, yet.
|
|
|
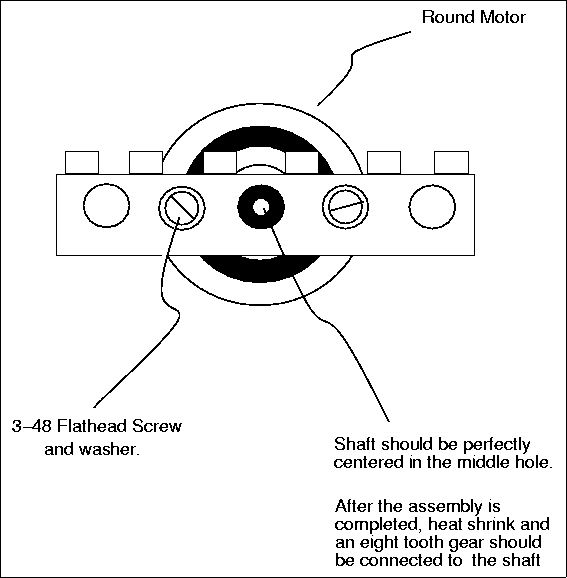
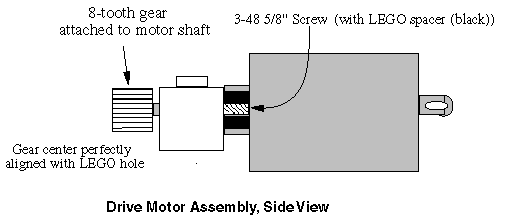
Get a five hole LEGO beam. Use the 3-48 washers and 5/8 inch 3-48 screws in the second and fourth holes of the beam to screw into the two threaded holes on the front of the motor, as shown in Figure 2.33. Before the screws are inserted into the motor, place a small plastic LEGO spacer between the motor and the LEGO beam. Do this for each screw. Tighten firmly, so that the motor is flush with the third hole of the beam. Make sure that the screws have gone in straight and that the motor shaft is centered in the third hole of the beam. |
- Get an 8-tooth LEGO gear. It has two inside surfaces: a beveled surface and a flat surface. The gear will slide on easier when the beveled side is placed on first. Push the gear onto the motor shaft until it just about touches the LEGO beam. It should now turn without slippage. The gear should not be wobbly. Your motor assembly should now look like Figure 2.34.
LEGOizing the Oblate Johnson Motor
- Cut two pieces of medium (1/8 inch) heat-shrink tubing the
length of one 8-tooth gear, place one on the shaft, and apply heat.
Then add the second piece and apply heat. Make sure that the tubing
is not rubbing against the motor housing when the shaft turns. This
action could cause a decrease in the performance of the motor. The
LEGO gear should be able to fit very snugly over the shaft and the
tubing. A small amount of super glue or epoxy may be added to
the heat-shrink before attaching the gear to the motor, but this is
not usually necessary. If super glue is used, pat off any of the
excess glue with a paper towel before sliding the gear onto the
shaft.
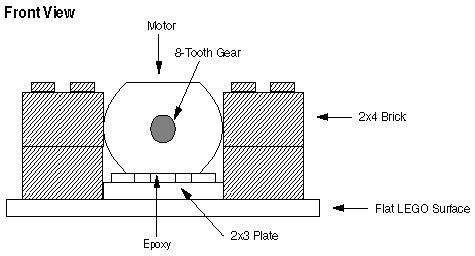
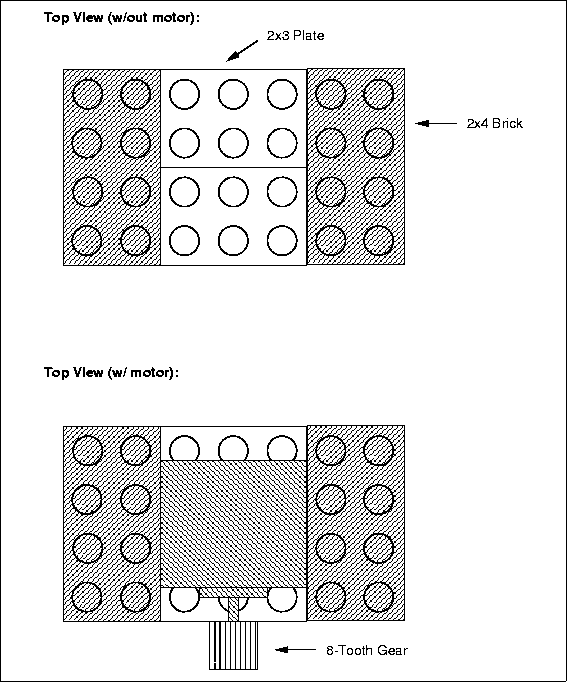
- On a flat LEGO surface (e.g. a large plate) build the structure
shown in Figures 2.35
and 2.36.
This structure consists of two 2x3 flat plates and several 2x4
bricks. Start by laying the 2x3 plates next to each other such that
the plates are joined as shown in the diagram. The 2x4 bricks are
not part of the mounting itself, but are used to stabilize the
Johnson motor until the epoxy has dried.
- Verify the assembly by meshing the Johnson motor with a gear that is already attached to a piece of LEGO. Verify that all parts can move freely and that the gears mesh.
- Once you are sure that the motor fits properly, spread some epoxy on the top of the two 2x3 LEGO plates, as well as on the bottom of the motor. Place the motor on the 2x3 plates as shown in Figure 2.36. Let the epoxy set. Do not disturb the motor until this has happened. Once the epoxy has completely dried, the LEGOized motor can be removed and attached to your robot.
Alternate Motor Mounting
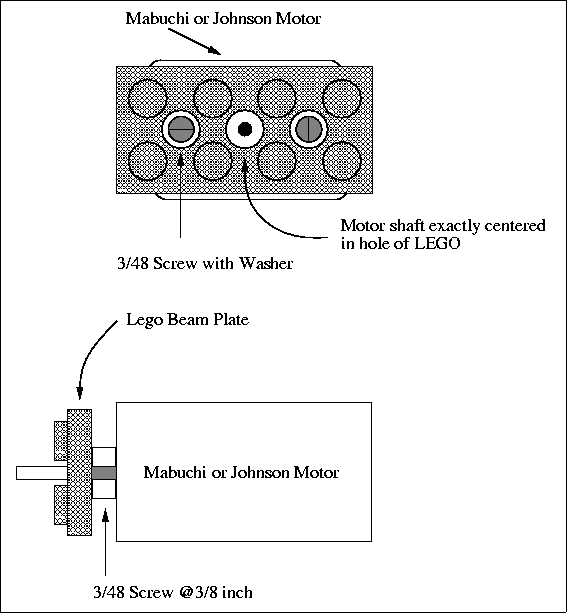
Both the Mabuchi and the Johnson motors can be mounted on a LEGO beam plate.
- Place heat-shrink on the motor shaft as per the standard
mounting methods.
- Get LEGO beam plate. Take the 3-48 screws and washers and screw them into the two threaded holes on the front of the motor, as shown in Figure 2.37. Both motors require 3/8 inch 3-48 screws as opposed to the 5/8 inch 3-48 screws used in mounting the Mabuchi motor to a beam. Tighten firmly, so that the motor is flush with the beam plate. Make sure that the screws have gone in straight and that the motor shaft is centered in the hole of the beam plate.
- Attach an 8-tooth gear to the motor shaft, verifying that the gear can spin and is centered before applying any super glue.
Wiring a Cable and Plug to a Motor
- Motor cables should be constructed with two strands of ribbon cable wire. Cut an 8-inch to 12-inch length of the wire.
- Strip and tin both ends of the wire.
- On the side of the motor there should be two metal lead/pads. Solder one wire lead to each pad. After proper soldering, hot glue may be used to hold the wire to the side of the motor for a stress relief.
- Motor plugs should be wired for bidirectional use, as shown in
Figure 2.21.
For the following steps, cut three-long strips of male socket header as needed.
- Using the connector plug wiring technique shown in Figure 2.22
through Figure 2.25,
wire the motor plug. Polarity does not matter since the plug may be
inserted into a motor power jack in either orientation. However,
placing a tag of tape on one of the wires just above the header will
keep the motor orientation consistent. Even though the motors will
operate when plugged in backwards, labeling the motor saves time.
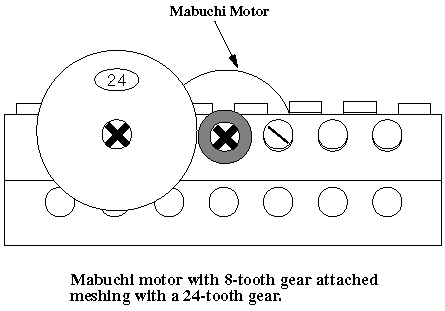
Once the motor assembly is complete, the motors are ready to become part of your robot. Figure 2.38 gives an example of how LEGO gears will now mesh with the drive motor. Chapter 8 will cover creating LEGO geartrains in greater detail.
Stepper Motor
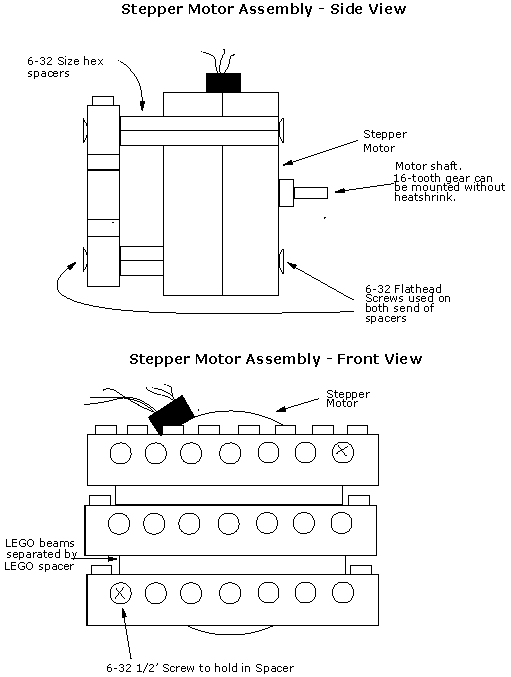
Figure 2.39 shows one possible way of mounting the stepper motor available upon request for the 1999 ELEC 201 class. By using LEGO beams and spacers and the hardware provided with the stepper motor, many other possibilities for mounting exist.
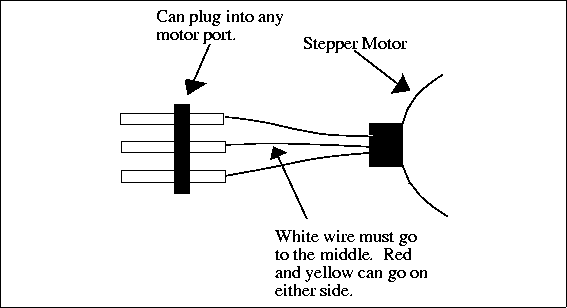
The stepper motor has two sets of three wires coming from it. Each of these sets may be connected to a three-prong male header as shown in Figure 2.40. If the stepper motor is to be used to turn in only one direction, only one of these sets needs to be connected to a header. For bidirectional control, both sets must be connected to the three pin male headers. Stepper motors may be connected to any of the six motor ports (two at a time for bidirectional control).
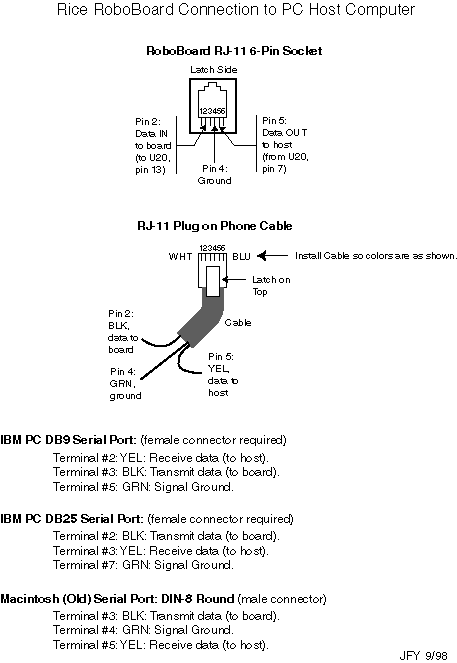
Computer Cable Wiring
